This page was generated from examples/models/alibaba_ack_deep_mnist/alibaba_cloud_ack_deep_mnist.ipynb.
Alibaba Cloud Container Service for Kubernetes (ACK) Deep MNIST Example
In this example we will deploy a tensorflow MNIST model in the Alibaba Cloud Container Service for Kubernetes.
This tutorial will break down in the following sections:
Train a tensorflow model to predict mnist locally
Containerise the tensorflow model with our docker utility
Test model locally with docker
Set-up and configure Alibaba Cloud environment
Deploy your model and visualise requests
Let’s get started! 🚀🔥
Dependencies:
Helm v3.0.0+
kubectl v1.14+
Python 3.6+
Python DEV requirements
1) Train a tensorflow model to predict mnist locally
We will load the mnist images, together with their labels, and then train a tensorflow model to predict the right labels
[1]:
from tensorflow.examples.tutorials.mnist import input_data

mnist = input_data.read_data_sets("MNIST_data/", one_hot=True)
import tensorflow as tf

if __name__ == "__main__":

    x = tf.placeholder(tf.float32, [None, 784], name="x")

    W = tf.Variable(tf.zeros([784, 10]))
    b = tf.Variable(tf.zeros([10]))

    y = tf.nn.softmax(tf.matmul(x, W) + b, name="y")

    y_ = tf.placeholder(tf.float32, [None, 10])

    cross_entropy = tf.reduce_mean(
        -tf.reduce_sum(y_ * tf.log(y), reduction_indices=[1])
    )

    train_step = tf.train.GradientDescentOptimizer(0.5).minimize(cross_entropy)

    init = tf.initialize_all_variables()

    sess = tf.Session()
    sess.run(init)

    for i in range(1000):
        batch_xs, batch_ys = mnist.train.next_batch(100)
        sess.run(train_step, feed_dict={x: batch_xs, y_: batch_ys})

    correct_prediction = tf.equal(tf.argmax(y, 1), tf.argmax(y_, 1))
    accuracy = tf.reduce_mean(tf.cast(correct_prediction, tf.float32))
    print(sess.run(accuracy, feed_dict={x: mnist.test.images, y_: mnist.test.labels}))

    saver = tf.train.Saver()

    saver.save(sess, "model/deep_mnist_model")
WARNING:tensorflow:From <ipython-input-1-559b63ab8b48>:2: read_data_sets (from tensorflow.contrib.learn.python.learn.datasets.mnist) is deprecated and will be removed in a future version.
Instructions for updating:
Please use alternatives such as official/mnist/dataset.py from tensorflow/models.
WARNING:tensorflow:From /home/alejandro/miniconda3/envs/reddit-classification/lib/python3.7/site-packages/tensorflow/contrib/learn/python/learn/datasets/mnist.py:260: maybe_download (from tensorflow.contrib.learn.python.learn.datasets.base) is deprecated and will be removed in a future version.
Instructions for updating:
Please write your own downloading logic.
WARNING:tensorflow:From /home/alejandro/miniconda3/envs/reddit-classification/lib/python3.7/site-packages/tensorflow/contrib/learn/python/learn/datasets/mnist.py:262: extract_images (from tensorflow.contrib.learn.python.learn.datasets.mnist) is deprecated and will be removed in a future version.
Instructions for updating:
Please use tf.data to implement this functionality.
Extracting MNIST_data/train-images-idx3-ubyte.gz
WARNING:tensorflow:From /home/alejandro/miniconda3/envs/reddit-classification/lib/python3.7/site-packages/tensorflow/contrib/learn/python/learn/datasets/mnist.py:267: extract_labels (from tensorflow.contrib.learn.python.learn.datasets.mnist) is deprecated and will be removed in a future version.
Instructions for updating:
Please use tf.data to implement this functionality.
Extracting MNIST_data/train-labels-idx1-ubyte.gz
WARNING:tensorflow:From /home/alejandro/miniconda3/envs/reddit-classification/lib/python3.7/site-packages/tensorflow/contrib/learn/python/learn/datasets/mnist.py:110: dense_to_one_hot (from tensorflow.contrib.learn.python.learn.datasets.mnist) is deprecated and will be removed in a future version.
Instructions for updating:
Please use tf.one_hot on tensors.
Extracting MNIST_data/t10k-images-idx3-ubyte.gz
Extracting MNIST_data/t10k-labels-idx1-ubyte.gz
WARNING:tensorflow:From /home/alejandro/miniconda3/envs/reddit-classification/lib/python3.7/site-packages/tensorflow/contrib/learn/python/learn/datasets/mnist.py:290: DataSet.__init__ (from tensorflow.contrib.learn.python.learn.datasets.mnist) is deprecated and will be removed in a future version.
Instructions for updating:
Please use alternatives such as official/mnist/dataset.py from tensorflow/models.
WARNING:tensorflow:From /home/alejandro/miniconda3/envs/reddit-classification/lib/python3.7/site-packages/tensorflow/python/framework/op_def_library.py:263: colocate_with (from tensorflow.python.framework.ops) is deprecated and will be removed in a future version.
Instructions for updating:
Colocations handled automatically by placer.
WARNING:tensorflow:From /home/alejandro/miniconda3/envs/reddit-classification/lib/python3.7/site-packages/tensorflow/python/ops/math_ops.py:3066: to_int32 (from tensorflow.python.ops.math_ops) is deprecated and will be removed in a future version.
Instructions for updating:
Use tf.cast instead.
WARNING:tensorflow:From /home/alejandro/miniconda3/envs/reddit-classification/lib/python3.7/site-packages/tensorflow/python/util/tf_should_use.py:193: initialize_all_variables (from tensorflow.python.ops.variables) is deprecated and will be removed after 2017-03-02.
Instructions for updating:
Use `tf.global_variables_initializer` instead.
0.9191
2) Containerise the tensorflow model with our docker utility
Create a wrapper file that exposes the functionality through a predict function:
[2]:
%%writefile DeepMnist.py
import tensorflow as tf
import numpy as np

class DeepMnist(object):
    def __init__(self):
        self.class_names = ["class:{}".format(str(i)) for i in range(10)]
        self.sess = tf.Session()
        saver = tf.train.import_meta_graph("model/deep_mnist_model.meta")
        saver.restore(self.sess,tf.train.latest_checkpoint("./model/"))

        graph = tf.get_default_graph()
        self.x = graph.get_tensor_by_name("x:0")
        self.y = graph.get_tensor_by_name("y:0")

    def predict(self,X,feature_names):
        predictions = self.sess.run(self.y,feed_dict={self.x:X})
        return predictions.astype(np.float64)
Overwriting DeepMnist.py
Define the dependencies for the wrapper in the requirements.txt:
[5]:
%%writefile requirements.txt
tensorflow>=1.12.0
Overwriting requirements.txt
You need to make sure that you have added the .s2i/environment configuration file in this folder with the following content:
[3]:
!mkdir .s2i
mkdir: cannot create directory ‘.s2i’: File exists
[4]:
%%writefile .s2i/environment
MODEL_NAME=DeepMnist
API_TYPE=REST
SERVICE_TYPE=MODEL
PERSISTENCE=0
Overwriting .s2i/environment
Now we can build a docker image named “deep-mnist” with the tag 0.1
[10]:
!s2i build . seldonio/seldon-core-s2i-python37:1.19.0-dev deep-mnist:0.1
---> Installing application source...
---> Installing dependencies ...
Looking in links: /whl
Requirement already satisfied: tensorflow>=1.12.0 in /usr/local/lib/python3.6/site-packages (from -r requirements.txt (line 1)) (1.13.1)
Requirement already satisfied: keras-applications>=1.0.6 in /usr/local/lib/python3.6/site-packages (from tensorflow>=1.12.0->-r requirements.txt (line 1)) (1.0.7)
Requirement already satisfied: absl-py>=0.1.6 in /usr/local/lib/python3.6/site-packages (from tensorflow>=1.12.0->-r requirements.txt (line 1)) (0.7.1)
Requirement already satisfied: gast>=0.2.0 in /usr/local/lib/python3.6/site-packages (from tensorflow>=1.12.0->-r requirements.txt (line 1)) (0.2.2)
Requirement already satisfied: keras-preprocessing>=1.0.5 in /usr/local/lib/python3.6/site-packages (from tensorflow>=1.12.0->-r requirements.txt (line 1)) (1.0.9)
Requirement already satisfied: tensorboard<1.14.0,>=1.13.0 in /usr/local/lib/python3.6/site-packages (from tensorflow>=1.12.0->-r requirements.txt (line 1)) (1.13.1)
Requirement already satisfied: astor>=0.6.0 in /usr/local/lib/python3.6/site-packages (from tensorflow>=1.12.0->-r requirements.txt (line 1)) (0.7.1)
Requirement already satisfied: wheel>=0.26 in /usr/local/lib/python3.6/site-packages (from tensorflow>=1.12.0->-r requirements.txt (line 1)) (0.32.2)
Requirement already satisfied: protobuf>=3.6.1 in /usr/local/lib/python3.6/site-packages (from tensorflow>=1.12.0->-r requirements.txt (line 1)) (3.7.1)
Requirement already satisfied: six>=1.10.0 in /usr/local/lib/python3.6/site-packages (from tensorflow>=1.12.0->-r requirements.txt (line 1)) (1.12.0)
Requirement already satisfied: grpcio>=1.8.6 in /usr/local/lib/python3.6/site-packages (from tensorflow>=1.12.0->-r requirements.txt (line 1)) (1.20.1)
Requirement already satisfied: termcolor>=1.1.0 in /usr/local/lib/python3.6/site-packages (from tensorflow>=1.12.0->-r requirements.txt (line 1)) (1.1.0)
Requirement already satisfied: numpy>=1.13.3 in /usr/local/lib/python3.6/site-packages (from tensorflow>=1.12.0->-r requirements.txt (line 1)) (1.16.3)
Requirement already satisfied: tensorflow-estimator<1.14.0rc0,>=1.13.0 in /usr/local/lib/python3.6/site-packages (from tensorflow>=1.12.0->-r requirements.txt (line 1)) (1.13.0)
Requirement already satisfied: h5py in /usr/local/lib/python3.6/site-packages (from keras-applications>=1.0.6->tensorflow>=1.12.0->-r requirements.txt (line 1)) (2.9.0)
Requirement already satisfied: markdown>=2.6.8 in /usr/local/lib/python3.6/site-packages (from tensorboard<1.14.0,>=1.13.0->tensorflow>=1.12.0->-r requirements.txt (line 1)) (3.1)
Requirement already satisfied: werkzeug>=0.11.15 in /usr/local/lib/python3.6/site-packages (from tensorboard<1.14.0,>=1.13.0->tensorflow>=1.12.0->-r requirements.txt (line 1)) (0.15.4)
Requirement already satisfied: setuptools in /usr/local/lib/python3.6/site-packages (from protobuf>=3.6.1->tensorflow>=1.12.0->-r requirements.txt (line 1)) (40.6.2)
Requirement already satisfied: mock>=2.0.0 in /usr/local/lib/python3.6/site-packages (from tensorflow-estimator<1.14.0rc0,>=1.13.0->tensorflow>=1.12.0->-r requirements.txt (line 1)) (3.0.5)
Url '/whl' is ignored. It is either a non-existing path or lacks a specific scheme.
You are using pip version 18.1, however version 19.1.1 is available.
You should consider upgrading via the 'pip install --upgrade pip' command.
Build completed successfully
3) Test model locally with docker
We first run the docker image we just created as a container called “mnist_predictor”
[3]:
!docker run --name "mnist_predictor" -d --rm -p 5000:5000 deep-mnist:0.1
9087047e368ac8f285e1f742704b4c0c7bceac7d29ee90b3b0a6ef2d61ebd15c
Send some random features that conform to the contract
[6]:
import matplotlib.pyplot as plt
import numpy as np

# This is the variable that was initialised at the beginning of the file
i = [0]
x = mnist.test.images[i]
y = mnist.test.labels[i]
plt.imshow(x.reshape((28, 28)), cmap="gray")
plt.show()
print("Expected label: ", np.sum(range(0, 10) * y), ". One hot encoding: ", y)
Expected label: 7.0 . One hot encoding: [[0. 0. 0. 0. 0. 0. 0. 1. 0. 0.]]
[7]:
import math

import numpy as np

from seldon_core.seldon_client import SeldonClient

# We now test the REST endpoint expecting the same result
endpoint = "0.0.0.0:5000"
batch = x
payload_type = "ndarray"

sc = SeldonClient(microservice_endpoint=endpoint)

# We use the microservice, instead of the "predict" function
client_prediction = sc.microservice(
    data=batch, method="predict", payload_type=payload_type, names=["tfidf"]
)

for proba, label in zip(
    client_prediction.response.data.ndarray.values[0].list_value.ListFields()[0][1],
    range(0, 10),
):
    print(f"LABEL {label}:\t {proba.number_value*100:6.4f} %")
LABEL 0:         0.0064 %
LABEL 1:         0.0000 %
LABEL 2:         0.0155 %
LABEL 3:         0.2862 %
LABEL 4:         0.0003 %
LABEL 5:         0.0027 %
LABEL 6:         0.0000 %
LABEL 7:         99.6643 %
LABEL 8:         0.0020 %
LABEL 9:         0.0227 %
[8]:
!docker rm mnist_predictor --force
mnist_predictor
4) Set-up and configure Alibaba Cloud environment
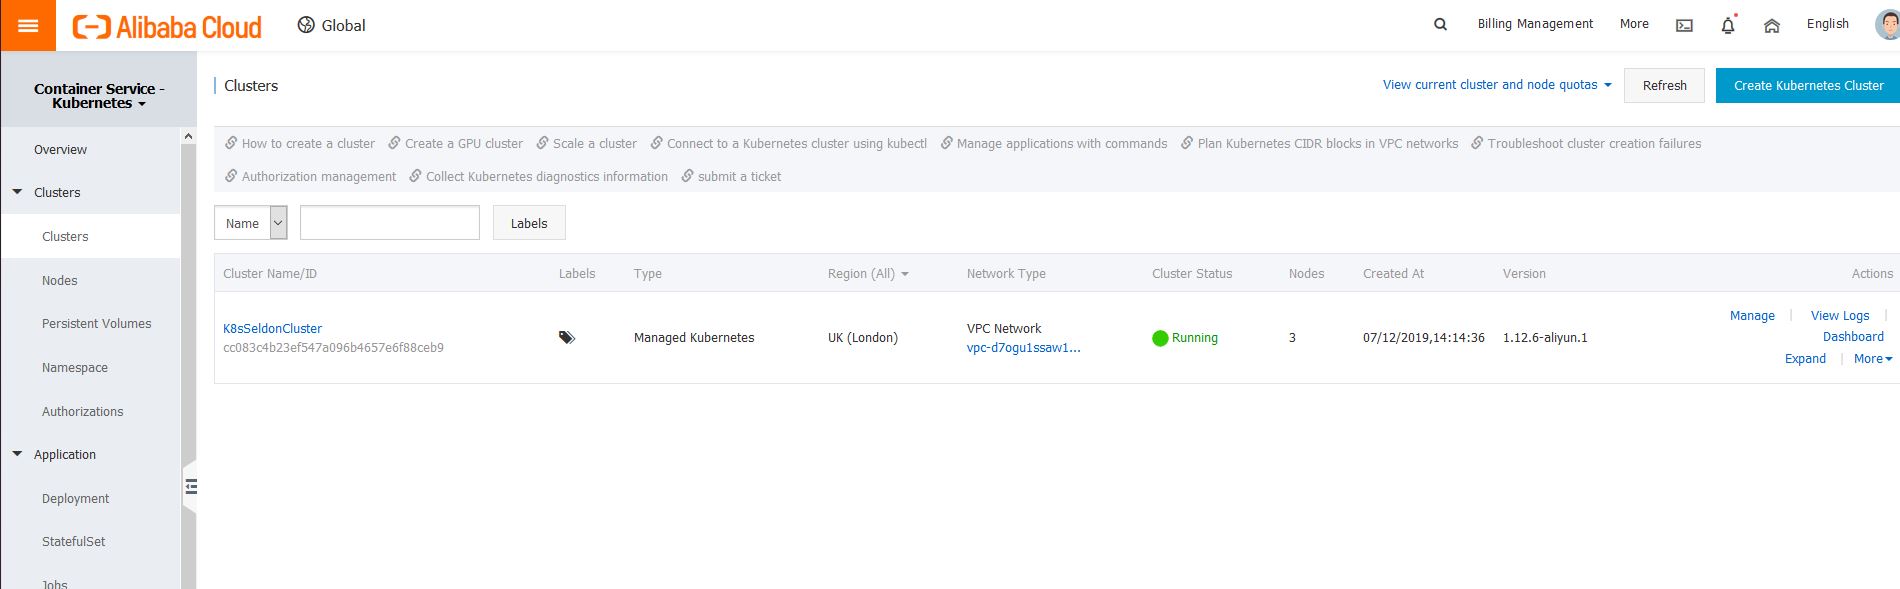
4.1 create a managed kubernetes cluster
We need to first create a cluster in Alibaba Cloud - you should follow the following instructions (make sure you expose the cluster with an elastic IP by checking the tickbox): https://www.alibabacloud.com/help/doc-detail/95108.htm
You should follow up the instructions but the finished cluster should look as follows:
4.2 Copy the kubectl configuration to access the cluster
Once you have the cluster created, you will be able to use your local kubectl by copying the configuration details on the overview page, and copy it to your ~/.kube/config
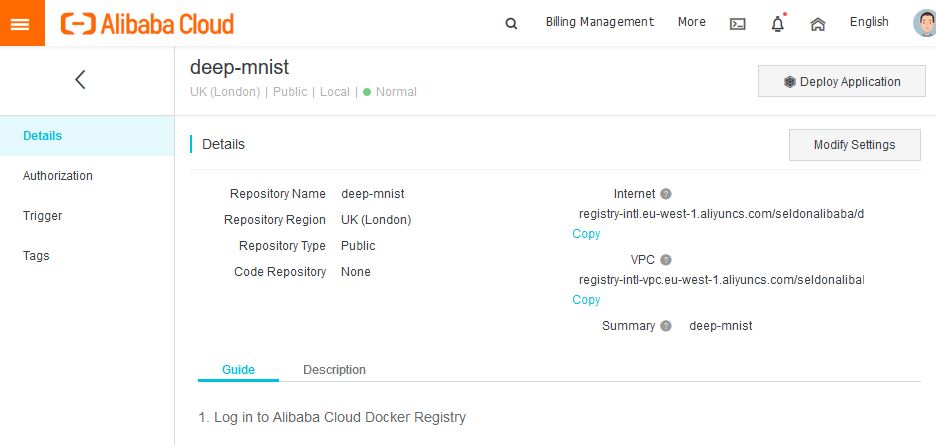
4.3 Create an Alibaba Container Registry to push the image
Finally we need to create a container registry repository by following this guide: https://www.alibabacloud.com/blog/up-and-running-with-alibaba-cloud-container-registry_593765
Setup Seldon Core
Use the setup notebook to Setup Cluster with Ambassador Ingress and Install Seldon Core. Instructions also online.
Finally we install the Seldon Analytics Package
[1]:
!helm install seldon-core-analytics seldon-core-analytics --repo https://storage.googleapis.com/seldon-charts
!kubectl rollout status deployment.apps/grafana-prom-deployment
!kubectl patch svc grafana-prom --type='json' -p '[{"op":"replace","path":"/spec/type","value":"LoadBalancer"}]'
Error: rendered manifests contain a resource that already exists. Unable to continue with install: existing resource conflict: kind: Secret, namespace: default, name: grafana-prom-secret
deployment "grafana-prom-deployment" successfully rolled out
service/grafana-prom patched
4.5 Push docker image
We’ll now make sure the image is accessible within the Kubernetes cluster by pushing it to the repo that we created in step 4.3. This should look as follows in your dashboard:
To push the image we first tag it
[21]:
!docker tag deep-mnist:0.1 registry-intl.eu-west-1.aliyuncs.com/seldonalibaba/deep-mnist:0.1
And then we push it
[22]:
!docker push registry-intl.eu-west-1.aliyuncs.com/seldonalibaba/deep-mnist:0.1
The push refers to repository [registry-intl.eu-west-1.aliyuncs.com/seldonalibaba/deep-mnist]

358e90f3: Preparing
e4a983d1: Preparing
74b2c556: Preparing
9472b523: Preparing
a2a7ea60: Preparing
eddb328a: Preparing
1393f8e7: Preparing
67d6e30e: Preparing
f19da2c9: Preparing
9ec591c4: Preparing
32b1ff99: Preparing
64f96dbc: Preparing
e6d76fd9: Preparing
11a84ad4: Preparing
64f96dbc: Pushing  105.6MB/141.8MBPushing     512B/4.43kBPushing  548.9kB/648.8MBPushing  7.426MB/16.85MBPushing  57.75MB/65.26MBPushing  22.51MB/556.5MBPushing  45.06MB/648.8MBPushing   66.6MB/141.8MBPushing  82.16MB/556.5MBPushing  96.63MB/556.5MB4b2c556: Pushing    377MB/648.8MBPushing  72.91MB/648.8MBPushing  158.4MB/556.5MBPushing  103.4MBPushing  197.5MB/556.5MBPushing  266.3MB/556.5MBPushing  176.6MB/648.8MBPushing  268.1MB/648.8MBPushing  269.8MB/648.8MBPushing  280.8MB/648.8MBPushing  404.4MB/556.5MBPushing  422.9MB/556.5MBPushing  345.7MB/648.8MB4b2c556: Pushed   659.3MB/648.8MBPushing  467.2MB/648.8MB0.1: digest: sha256:13ab55662f0e8479bb51d998a8014f7f059a73422295bcd400f62615d36355dc size: 3482
5 - Deploy your model and visualise requests
IMPORTANT: Make sure you replace the URL for your repo in the format of: * registry-intl.[REPO].aliyuncs.com/[REGISTRY]/[REPO]:0.1
[24]:
%%writefile deep_mnist_deployment.yaml
---
apiVersion: machinelearning.seldon.io/v1alpha2
kind: SeldonDeployment
metadata:
  labels:
    app: seldon
  name: deep-mnist
spec:
  annotations:
    project_name: Tensorflow MNIST
    deployment_version: v1
  name: deep-mnist
  predictors:
  - componentSpecs:
    - spec:
        containers:
        # REPLACE_FOR_IMAGE_AND_TAG
        - image: registry-intl.eu-west-1.aliyuncs.com/seldonalibaba/deep-mnist:0.1
          imagePullPolicy: IfNotPresent
          name: classifier
          resources:
            requests:
              memory: 1Mi
        terminationGracePeriodSeconds: 20
    graph:
      children: []
      name: classifier
      endpoint:
        type: REST
      type: MODEL
    name: single-model
    replicas: 1
    annotations:
      predictor_version: v1
Overwriting deep_mnist_deployment.yaml
Run the deployment in your cluster
[ ]:
kubectl apply -f deep_mnist_deployment.yaml
And let’s check that it’s been created.
[ ]:
!kubectl get pods
Test the model
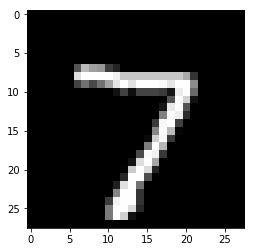
We’ll use a random example from our dataset
[28]:
import matplotlib.pyplot as plt
import numpy as np

# This is the variable that was initialised at the beginning of the file
i = [0]
x = mnist.test.images[i]
y = mnist.test.labels[i]
plt.imshow(x.reshape((28, 28)), cmap="gray")
plt.show()
print("Expected label: ", np.sum(range(0, 10) * y), ". One hot encoding: ", y)

Expected label: 7.0 . One hot encoding: [[0. 0. 0. 0. 0. 0. 0. 1. 0. 0.]]
First we need to find the URL that we’ll use
You need to add it to the script in the next block
[34]:
!kubectl get svc ambassador -o jsonpath='{.status.loadBalancer.ingress[0].ip}'
8.208.23.117
We can now add the URL above to send our request:
[42]:
import math
import subprocess

import numpy as np

from seldon_core.seldon_client import SeldonClient

# Add the URL you found above, here:
HOST = "8.208.23.117"


port = "80"  # Make sure you use the port above
batch = x
payload_type = "ndarray"

sc = SeldonClient(
    gateway="ambassador", gateway_endpoint=HOST + ":" + port, namespace="default"
)

client_prediction = sc.predict(
    data=batch, deployment_name="deep-mnist", names=["text"], payload_type=payload_type
)

print(client_prediction.response)
meta {
  puid: "krop281g4e1mrsgf60m7ilh1fc"
  requestPath {
    key: "classifier"
    value: "registry-intl.eu-west-1.aliyuncs.com/seldonalibaba/deep-mnist:0.1"
  }
}
data {
  names: "class:0"
  names: "class:1"
  names: "class:2"
  names: "class:3"
  names: "class:4"
  names: "class:5"
  names: "class:6"
  names: "class:7"
  names: "class:8"
  names: "class:9"
  ndarray {
    values {
      list_value {
        values {
          number_value: 4.4009637349518016e-05
        }
        values {
          number_value: 6.321029477618367e-09
        }
        values {
          number_value: 0.0001286377664655447
        }
        values {
          number_value: 0.0030034701339900494
        }
        values {
          number_value: 3.061768893530825e-06
        }
        values {
          number_value: 1.882280412246473e-05
        }
        values {
          number_value: 1.8899024567531342e-08
        }
        values {
          number_value: 0.9959828853607178
        }
        values {
          number_value: 2.070009031740483e-05
        }
        values {
          number_value: 0.0007983553223311901
        }
      }
    }
  }
}
Let’s see the predictions for each label
It seems that it correctly predicted the number 7
[41]:
for proba, label in zip(
    client_prediction.response.data.ndarray.values[0].list_value.ListFields()[0][1],
    range(0, 10),
):
    print(f"LABEL {label}:\t {proba.number_value*100:6.4f} %")
LABEL 0:         0.0044 %
LABEL 1:         0.0000 %
LABEL 2:         0.0129 %
LABEL 3:         0.3003 %
LABEL 4:         0.0003 %
LABEL 5:         0.0019 %
LABEL 6:         0.0000 %
LABEL 7:         99.5983 %
LABEL 8:         0.0021 %
LABEL 9:         0.0798 %
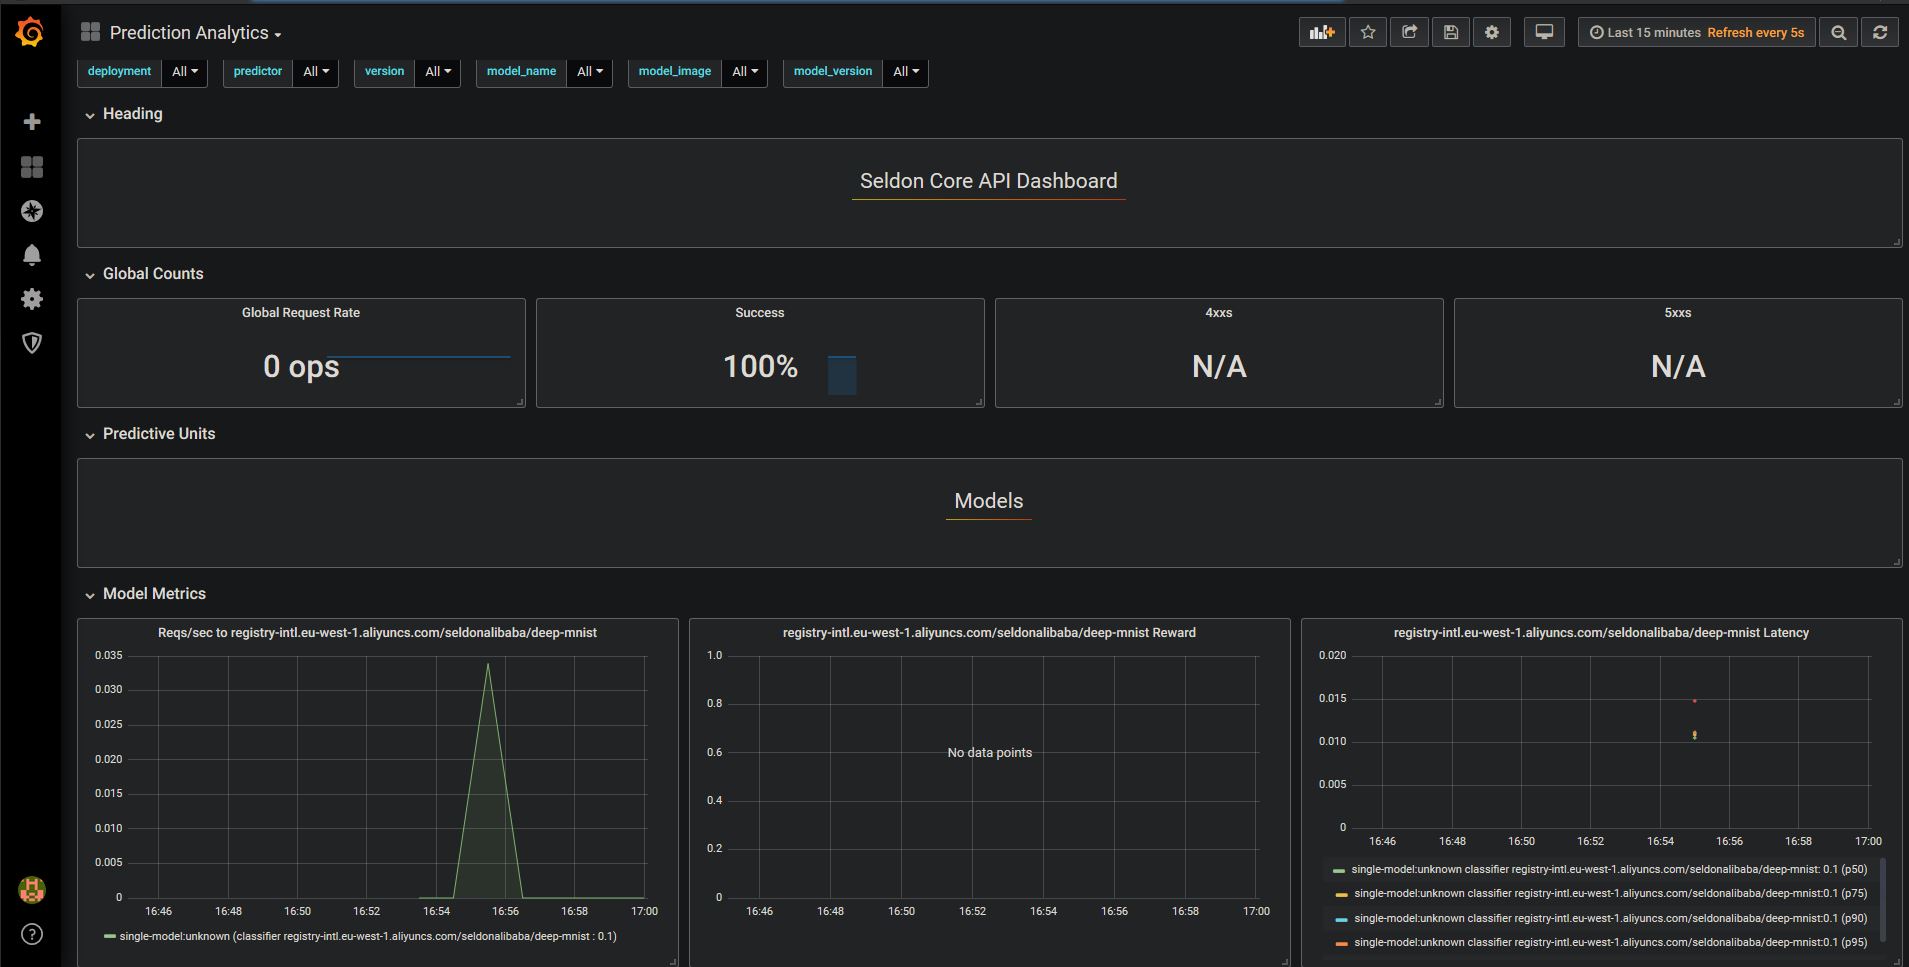
Finally let’s visualise the metrics that seldon provides out of the box
For this we can access the URL with the command below, it will request an admin and password which by default are set to the following: * Username: admin * Password: admin
You will be able to access it at http://[URL]/d/ejAHFXIWz/prediction-analytics?orgId=1
[43]:
!kubectl get svc grafana-prom -o jsonpath='{.status.loadBalancer.ingress[0].ip}'
8.208.25.68
The metrics include requests per second, as well as latency. You are able to add your own custom metrics, and try out other more complex deployments by following furher guides at https://docs.seldon.io/projects/seldon-core/en/latest/examples/notebooks.html