This page was generated from examples/cicd/sig-mlops-jenkins-classic/jenkins_classic.ipynb.
MLOps with Seldon and Jenkins Classic
This repository shows how you can build a Jenkins Classic pipeline to enable Continuous Integration and Continuous Delivery (CI/CD) on your Machine Learning models leveraging Seldon for deployment. This CI/CD pipeline will allow you to:
Run unit tests using Jenkins Classic.
Run end-to-end tests for your model with KIND (Kubernetes in Docker).
Promote your model as a across multiple (staging / prod) environments.
To showcase these features we will implement add continuous integration and delivery to three different models. You can find these under the /models folder. As we shall see, each of them will require a different approach to deployment.
CI/CD Pipeline
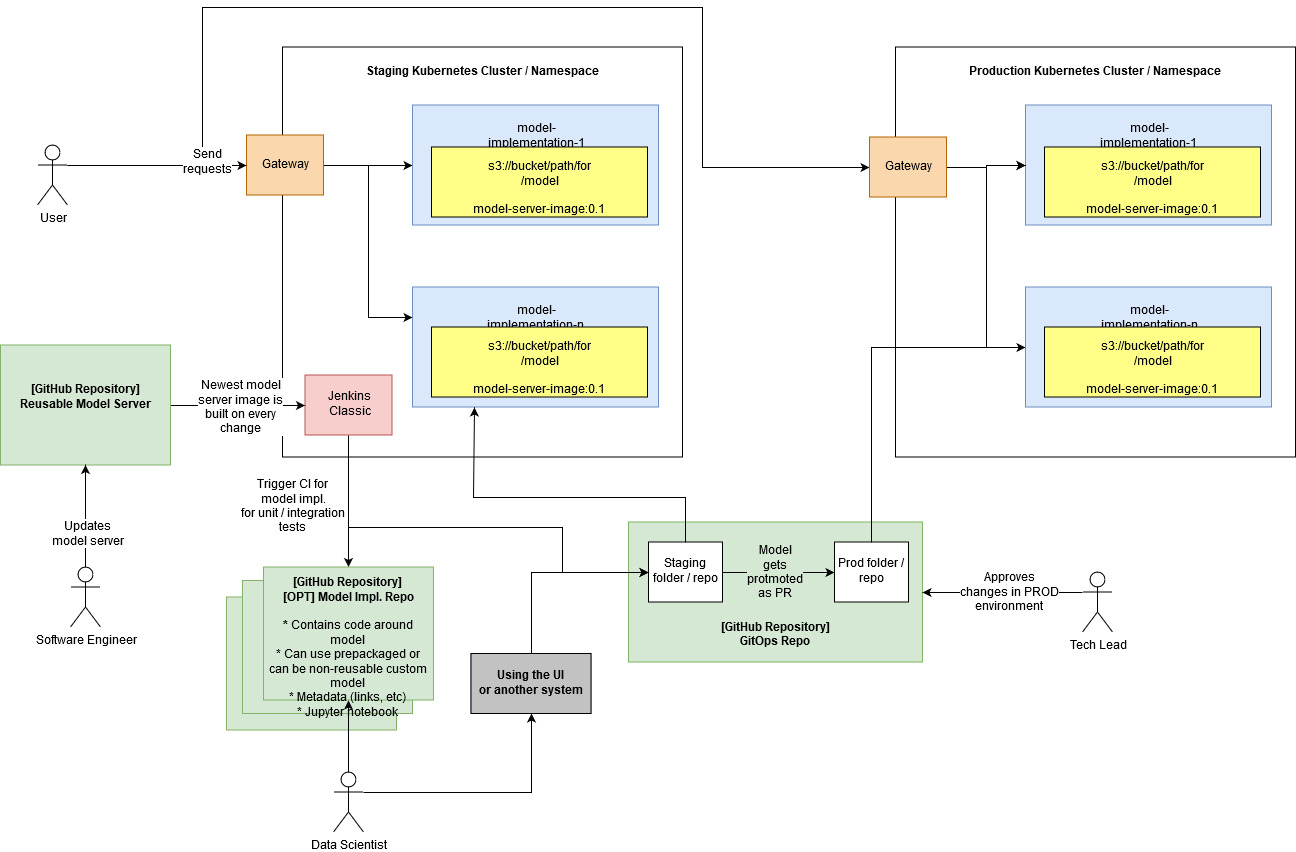
The diagram below provides a high level overview of the CI/CD pipeline. It includes an overview of all the different types of repositories, together with the stakeholders that are the primary contributors of each, as well as the Kubernetes environments in which the applications are deployed.
The key pieces to note on the diagram are:
There are different types of environments with different restrictions and behaviours, e.g. staging and production.
It’s possible to have more than one environment for each type (as the type is just what would give it a specific type of config/behaviour).
The environments are by default in the same cluster (as namespaces), however it’s also possible to configure them across different clusters.
Each of the green boxes is a single repository, but it can also have a mono-repo approach, whereby each of the white boxes is a folder within a repo.
Model implementation repository
From a high-level point of view, when a model implementation repository is updated by a Data Scientist or ML Engineer, the Jenkins CI will push changes to the GitOps repository. This enables the following workflow:
A Data Scientist or ML Engineer trains a new model.
The Data Scientist or ML Engineer pushes the updated configuration to the model implementation repository.
The CI tool automatically builds and tests the model implementation.
The CI tool automatically pushes the change into the GitOps staging repository.
The CI tool automatically opens a PR into the GitOps production repository.
One key point to highlight which may not be obvious by just looking at the diagram is that in this phase of model implementation, the example above showcases how we can leverage a re-usable model server - that is, reusing a pre-built docker image instead of building one every time. If there are more custom requirements, the user is in full control of the steps performed by the CI Platform Jenkins. This means that it is also possible to build s2i wrapped components which may require training the image every time.
To gain a better understanding of how the CI/CD pipeline is implemented on each model implementation repository you can check the documented deep dive.
Why a new repo for every model?
A new model implementation repo is currently created because it provides us with a way to separate the “Model Deployment” phase and the “Model Training/Experimentation” phase, and allows us to use the repo as the integration between any frameworks that can serve as sources of models (MLFlow, Kubeflow, Spark, etc). The repo is able to store any metadata, IDs, and configuration files required, and is processed through the CI pipeline every time it is modified.
Building a docker image in model implementation repository
Whilst most of the times users of this approach will be leveraging re-usable model servers such as the SKLearn model server, it is also possible to build a docker image every single time (i.e. build a non-reusable model every time a model changes). This can be be done by adding the relevant steps which would most often include the s2i utility. This may be desired if there are non-standard linux libraries or non-standard depdencies that need to be re-installed every time.
GitOps repository
The state of each of our environments (e.g. production or staging) is stored on a GitOps repository. This repository contains all the different Kubernetes resources that have been deployed to each cluster. It is linked through ArgoCD to each of our Kubernetes clusters (or namespaces) so that a change in the repository triggers an update of our environment.
When the deployment configuration of a machine learning model implementation is updated, this will automatically make the changes available through a PR to the respective manager/tech-lead/approver. This step will enable the end to end machine learning model promotion to be reviewed and approved by the respective individual.
The manager/tech-lead will have to approve the PR before it can be merged. Once it’s approved, it will be merged into the GitOps repo, which will immediately trigger the update in the production namespace/cluster.
You can see an example of a GitOps repository in the SeldonIO/seldon-gitops repository.
Re-usable model server repository
If there is a need for a new reusable model server, then it’s possible to do so by creating a repository which would follow a different path. This would be different to the model implementation repository as it would only be built once in a while, whilst the model server would be built multiple times.
Set up
As a pre-requisite you need to ensure that have access to a Kubernetes cluster. In particular, this guide requires the following pre-requisites:
A Kubernetes cluster running v1.13+.
Jenkins Classic installed in your cluster. You can find instructions on how to install and configure it on the Installing Jenkins on your K8s cluster section.
Seldon Core v0.5.1 installed in your cluster.
Use cases
This guide goes through three different methods to build and deploy your model. Each of these can be found under the ./models/ of this repository.
Using Seldon pre-built re-usable model servers (
./models/news_classifier).Using custom re-usable servers (
./models/images_classifier).Using custom servers with an embedded model.
Diving into our CI/CD Pipeline
On this section we will dive into the internals of the CI/CD pipeline for our model implementation repositories. This includes a detailed description of the Jenkinsfile, as well as a look into our suggested testing methodology.
Note that this will cover a generic example. However, as we shall see, specialising this approach into any of our three main use cases will be straightforward.
We leverage Jenkins Pipelines in order to run our continuous integration and delivery automation. From a high-level point of view, the pipeline configuration will be responsible for:
Define a replicable test and build environment.
Run the unit and integration tests (if applicable).
Promote the application into our staging and production environments.
We can see a Jenkinsfile below taken from the ./models/news_classifier example. This Jenkinsfile defines a pipeline which takes into account all of the points mentioned above. The following sections will dive into each of the sections in a much higher detail.
[1]:
%%writefile ./models/news_classifier/Jenkinsfile
pipeline {
  agent {
    kubernetes {
      defaultContainer 'core-builder'
      yamlFile 'models/news_classifier/podTemplate.yaml'
    }
  }

  stages {
    stage('Test') {
      steps {
        sh '''
          cd models/news_classifier
          make install_dev test
        '''
      }
    }

    stage('Test integration') {
      steps {
        sh '''
          cd models/news_classifier
          ./integration/kind_test_all.sh
        '''
      }
    }

    stage('Promote application') {
      steps {
        withCredentials([[$class: 'UsernamePasswordMultiBinding',
              credentialsId: 'github-access',
              usernameVariable: 'GIT_USERNAME',
              passwordVariable: 'GIT_PASSWORD']]) {
          sh '''
            cd models/news_classifier
            ./promote_application.sh
          '''
        }
      }
    }

  }
}
Overwriting ./models/news_classifier/Jenkinsfile
[2]:
%%writefile ./models/news_classifier/podTemplate.yaml
apiVersion: v1
kind: Pod
metadata:
  name: test-pod
spec:
  containers:
  - name: core-builder
    image: seldonio/core-builder:0.8
    resources:
      limits:
        cpu: 500m
        memory: 1500Mi
        ephemeral-storage: "15Gi"
      requests:
        cpu: 200m
        memory: 1500Mi
        ephemeral-storage: "15Gi"
    securityContext:
      privileged: true
    tty: true
    volumeMounts:
      - mountPath: /lib/modules
        name: modules
        readOnly: true
      - mountPath: /sys/fs/cgroup
        name: cgroup
      - mountPath: /var/lib/docker
        name: dind-storage
  volumes:
  - name: modules
    hostPath:
      path: /lib/modules
  - name: cgroup
    hostPath:
      path: /sys/fs/cgroup
  - name: dind-storage
    emptyDir: {}
Overwriting ./models/news_classifier/podTemplate.yaml
Replicable test and build environment
In order to ensure that our test environments are versioned and replicable, we make use of the Jenkins Kubernetes plugin. This will allow us to create a Docker image with all the necessary tools for testing and building our models. Using this image, we will then spin up a separate pod, where all our build instructions will be ran. We will use the podTemplate() object in the Jenkins Pipeline configuration to define the requirements of this
pod
Since it leverages Kubernetes underneath, this also ensure that our CI/CD pipelines are easily scalable.
Integration tests
Now that we have a model that we want to be able to deploy, we want to make sure that we run end-to-end tests on that model to make sure everything works as expected. For this we will leverage the same framework that the Kubernetes team uses to test Kubernetes itself: KIND.
KIND stands for Kubernetes-in-Docker, and is used to isolate a Kubernetes environent for end-to-end tests. In our case, we will use this isolated environment to test our model.
The steps we’ll have to carry out include:
Enable Docker within your CI/CD pod.
Add an integration test stage.
Leverage the
kind_test_all.shscript that creates a KIND cluster and runs the tests.
Add integration stage to Jenkins
We can leverage Jenkins Pipelines to manage the different stages of our CI/CD pipeline. In particular, to add an integration stage, we can use the stage() object:
stage('Test integration') {
  steps {
    sh '''
      cd models/news_classifier
      ./integration/kind_test_all.sh
    '''
  }
}
Enable Docker
To test our models, we will need to build their respective containers, for which we will need Docker.
In order to do so, we will first need to mount a few volumes into the CI/CD container. These basically consist of the core components that docker will need to be able to run. To mount them we will add these entries into the podTemplate.yaml file.
Please also note that we set container to run in privileged mode.
ApiVersion: v1
...
spec:
  containers:
  - name: core-builder
    ...
    securityContext:
      privileged: true
    ...
    volumeMounts:
      - mountPath: /lib/modules
        name: modules
        readOnly: true
      - mountPath: /sys/fs/cgroup
        name: cgroup
      - mountPath: /var/lib/docker
        name: dind-storage
  volumes:
  - name: modules
    hostPath:
      path: /lib/modules
  - name: cgroup
    hostPath:
      path: /sys/fs/cgroup
  - name: dind-storage
    emptyDir: {}
Run tests in Kind
The kind_run_all.sh may seem complicated at first, but it’s actually quite simple. All the script does is set-up a kind cluster with all dependencies, deploy the model and clean everything up. Let’s break down each of the components within the script.
We first start the docker daemon and wait until Docker is running (using docker ps q for guidance.
## FIRST WE START THE DOCKER DAEMON
service docker start
## the service can be started but the docker socket not ready, wait for ready
WAIT_N=0
while true; do
    # docker ps -q should only work if the daemon is ready
    docker ps -q > /dev/null 2>&1 && break
    if [[ ${WAIT_N} -lt 5 ]]; then
        WAIT_N=$((WAIT_N+1))
        echo "[SETUP] Waiting for Docker to be ready, sleeping for ${WAIT_N} seconds ..."
        sleep ${WAIT_N}
    else
        echo "[SETUP] Reached maximum attempts, not waiting any longer ..."
        break
    fi
done
Once we’re running a docker daemon, we can run the command to create our KIND cluster, and install all the components. This will set up a Kubernetes cluster using the docker daemon (using containers as Nodes), and then install Ambassador + Seldon Core.
########################################
## AVOID EXIT ON ERROR FOR FOLLOWING CMDS
set +o errexit

## START CLUSTER
make kind_create_cluster
KIND_EXIT_VALUE=$?

## Ensure we reach the kubeconfig path
export KUBECONFIG=$(kind get kubeconfig-path)

## ONLY RUN THE FOLLOWING IF SUCCESS
if [[ ${KIND_EXIT_VALUE} -eq 0 ]]; then
    # KIND CLUSTER SETUP
    make kind_setup
    SETUP_EXIT_VALUE=$?
We can now run the tests; for this we run all the dev installations and kick off our tests (which we’ll add inside of the integration folder).
    # BUILD S2I BASE IMAGES
    make build
    S2I_EXIT_VALUE=$?

    ## INSTALL ALL REQUIRED DEPENDENCIES
    make install_integration_dev
    INSTALL_EXIT_VALUE=$?

    ## RUNNING TESTS AND CAPTURING ERROR
    make test
    TEST_EXIT_VALUE=$?
fi
Finally we just clean everything, including the cluster, the containers and the docker daemon.
## DELETE KIND CLUSTER
make kind_delete_cluster
DELETE_EXIT_VALUE=$?

########################################
## EXIT STOPS COMMANDS FROM HERE ONWARDS
set -o errexit

## CLEANING DOCKER
docker ps -aq | xargs -r docker rm -f || true
service docker stop || true
Promote your application
After running our integration tests, the last step is to promote our model to our staging and production environments. For that, we will leverage our GitOps repository where the state of each environment is stored.
In particular, we will:
Push a change to the staging GitOps repository, which will update the staging environment instantly.
Submit a PR to the production GitOps repository, which will wait for a Tech Lead / Manager approval.
This will be handled by the promote_application.sh script, which can be seen below.
[13]:
%%writefile ./models/news_classifier/promote_application.sh
##!/bin/bash

## ENSURE WE ARE IN THE DIR OF SCRIPT
cd -P -- "$(dirname -- "$0")"
## SO WE CAN MOVE RELATIVE TO THE ACTUAL BASE DIR

export GITOPS_REPO="seldon-gitops"
export GITOPS_ORG="adriangonz"
export STAGING_FOLDER="staging"
export PROD_FOLDER="production"

## This is the user that is going to be assigned to PRs
export GIT_MANAGER="adriangonz"

export UUID=$(cat /proc/sys/kernel/random/uuid)

git clone https://${GIT_USERNAME}:${GIT_PASSWORD}@github.com/${GITOPS_ORG}/${GITOPS_REPO}

cd ${GITOPS_REPO}
cp -r ../charts/* ${STAGING_FOLDER}/.
ls ${STAGING_FOLDER}

## Check if any modifications identified
git add -N ${STAGING_FOLDER}/
git --no-pager diff --exit-code --name-only origin/master ${STAGING_FOLDER}
STAGING_MODIFIED=$?
if [[ $STAGING_MODIFIED -eq 0 ]]; then
  echo "Staging env not modified"
  exit 0
fi

## Adding changes to staging repo automatically
git add ${STAGING_FOLDER}/
git commit -m '{"Action":"Deployment created","Message":"","Author":"","Email":""}'
git push https://${GIT_USERNAME}:${GIT_PASSWORD}@github.com/${GITOPS_ORG}/${GITOPS_REPO}

## Add PR to prod
cp -r ../charts/* production/.

## Create branch and push
git checkout -b ${UUID}
git add ${PROD_FOLDER}/
git commit -m '{"Action":"Moving deployment to production repo","Message":"","Author":"","Email":""}'
git push https://${GIT_USERNAME}:${GIT_PASSWORD}@github.com/${GITOPS_ORG}/${GITOPS_REPO} ${UUID}

## Create pull request
export PR_RESULT=$(curl \
  -u ${GIT_USERNAME}:${GIT_PASSWORD} \
  -v -H "Content-Type: application/json" \
  -X POST -d "{\"title\": \"SeldonDeployment Model Promotion Request - UUID: ${UUID}\", \"body\": \"This PR contains the deployment for the Seldon Deploy model and has been allocated for review and approval for relevant manager.\", \"head\": \"${UUID}\", \"base\": \"master\" }" \
  https://api.github.com/repos/$GITOPS_ORG/$GITOPS_REPO/pulls)
export ISSUE_NUMBER=$(echo \
  $PR_RESULT |
  python -c 'import json,sys;obj=json.load(sys.stdin);print(obj["number"])')

## Assign PR to relevant user
curl \
  -u ${GIT_USERNAME}:${GIT_PASSWORD} \
  -v -H "Content-Type: application/json" \
  -X POST -d "{\"assignees\": [\"${GIT_MANAGER}\"] }" \
  https://api.github.com/repos/$GITOPS_ORG/$GITOPS_REPO/issues/$ISSUE_NUMBER
Overwriting ./models/news_classifier/promote_application.sh
Creating a CI/CD pipeline
In order to add a pipeline to Jenkins, you just have to go to the “Manage Jenkins” configuration dashboard, and click on “New Item” to create a new pipeline.
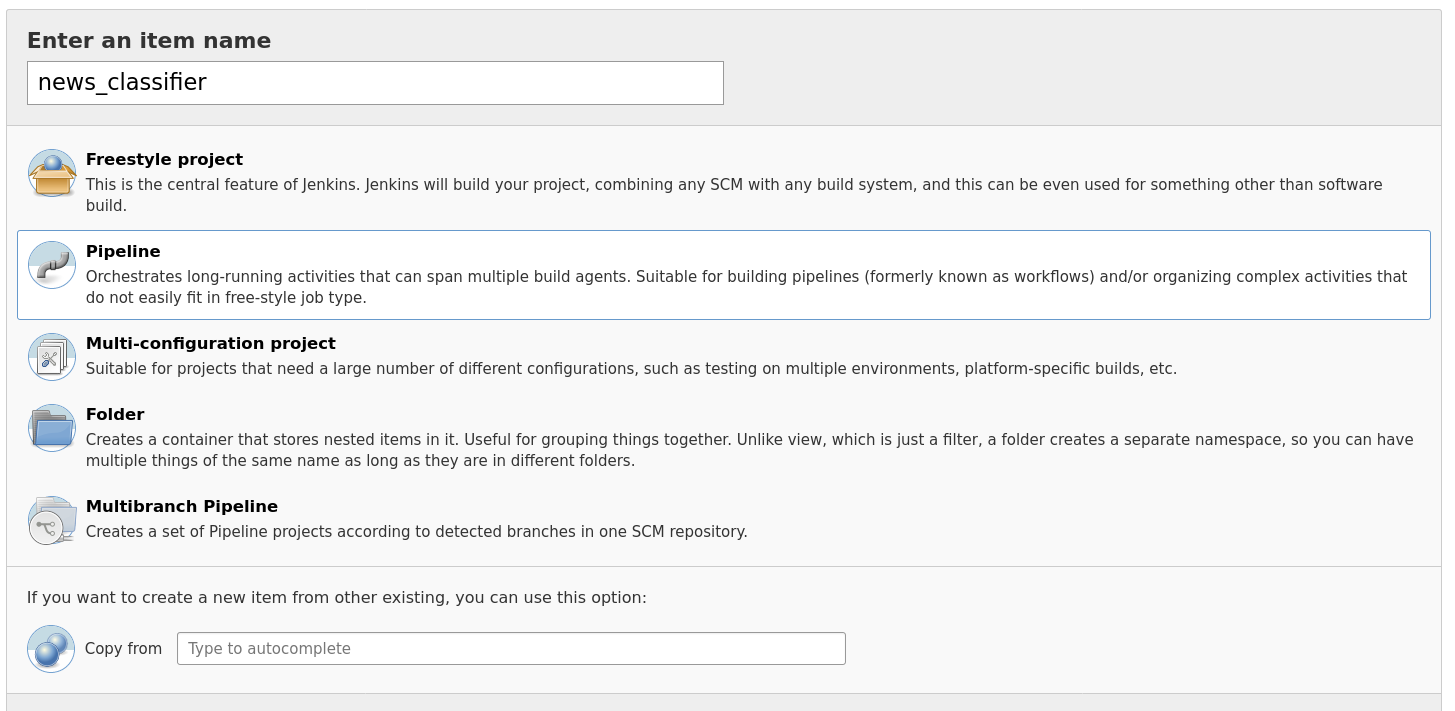
In the first menu, we’ll add a name. For example, we can create a new pipeline with name news_classifier. We will then be able to add the specific details. Most of these will remain on “default”, but we will need to change a couple of them to add a GitHub trigger, Docker access and to point to the right folder within the repository.
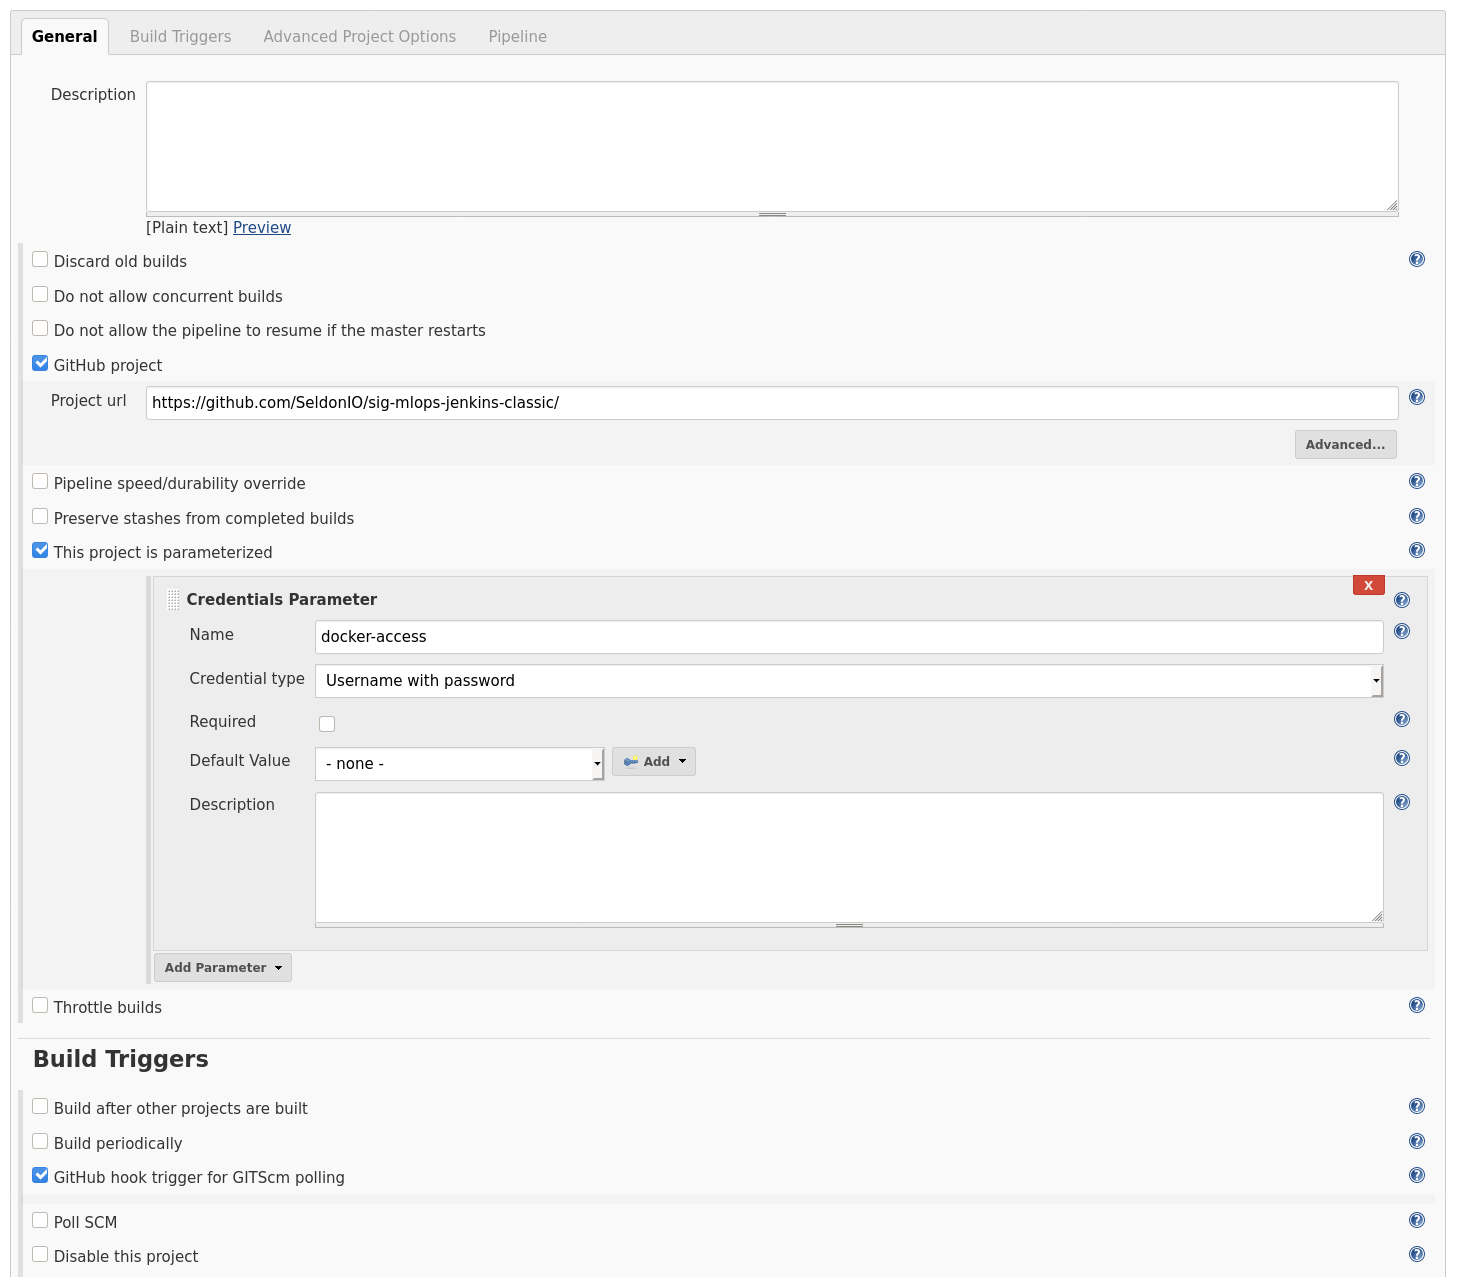
Firstly, we will change the following:
GitHub hook trigger for GITScm polling.
Tick “This project is parameterised”, and then when you see the next dialog:
Click on the “Add parameter” dropdown, and select “Credential Parameter”.
This will open yet another box, where you want to provide the following details:
name:
docker-accessCredential type “Username and Password”
Tick: required
Default value: Click on the “Add” dropdown, and then on “Jenkins provider”:
This has opened another dialog box, where you want to add your docker credentials.
For this you need to make sure that the current selected option is “Username and Password”.
There you have to enter your Docker username, and for password it’s advised to use a Docker API Key.
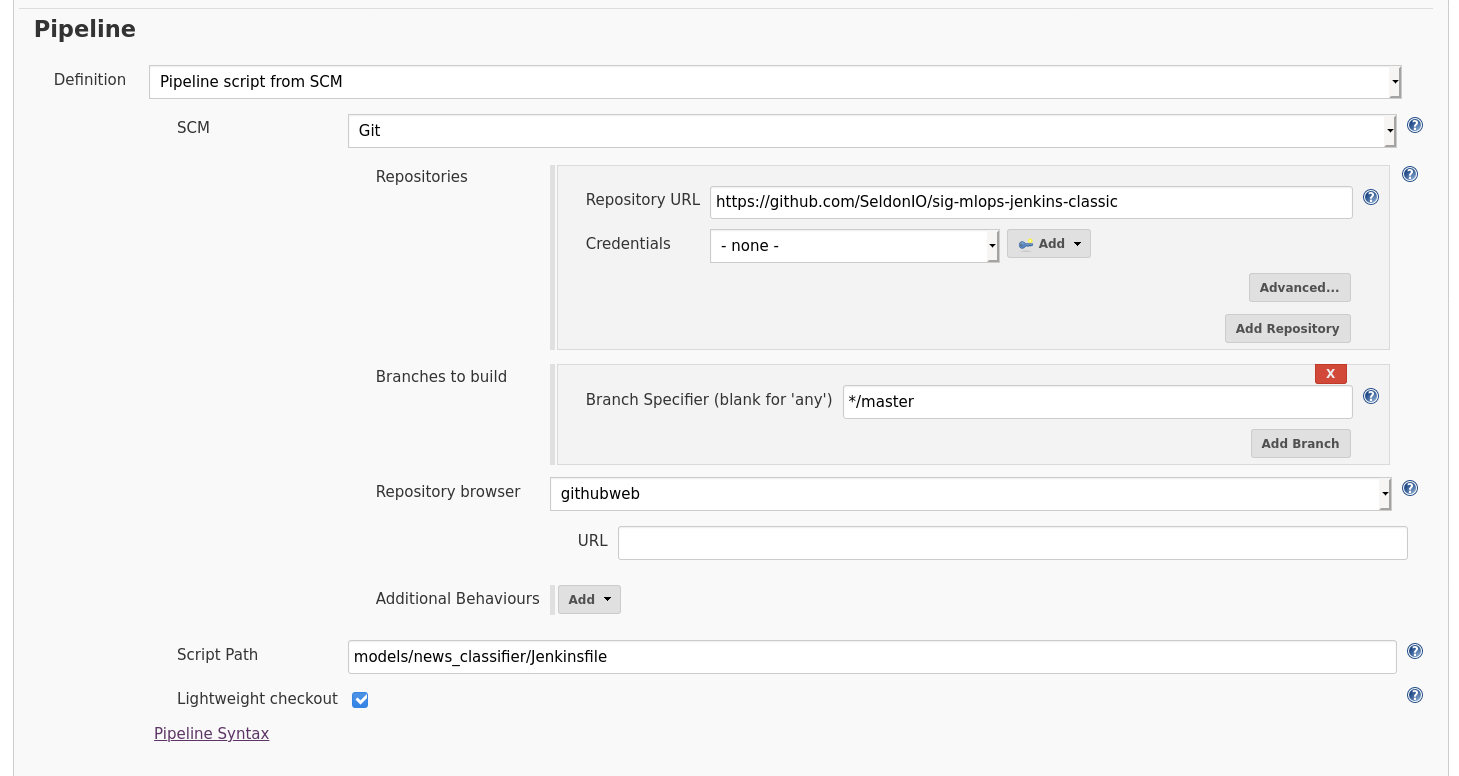
Lastly, we will need to point to the right Jenkinsfile. Note that since we are working with a monorepository, where multiple model implementations are tracked, we will need to point our pipeline to the ./models/news_classifier folder. If we were working with a single model implementation repository, we would only need to point to the global repo.
Select “Pipeline script from SCM” from dropdown.
Add the repository as SCM (in this case https://github.com/SeldonIO/sig-mlops-jenkins-classic/)
Point to the right
Jenkinsfileunder “Script Path”. In this case,models/news_classifier/Jenkinsfile.If needed, add credentials that will allow to access private repos.
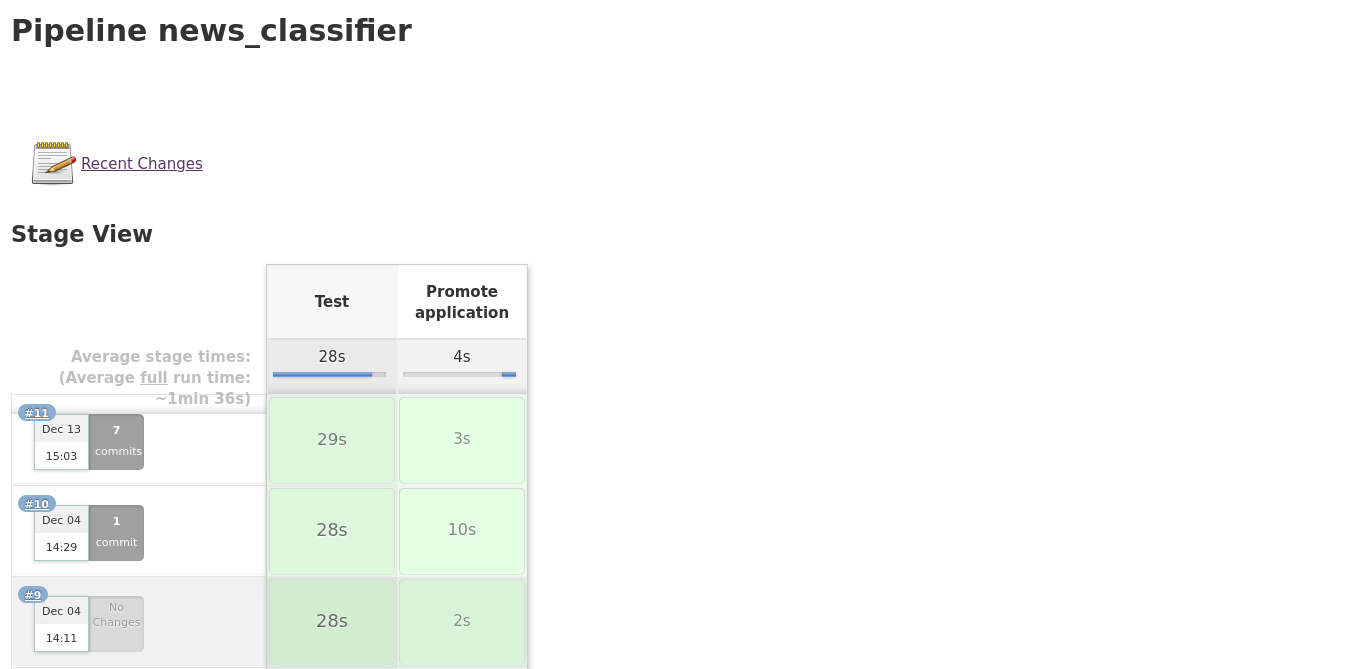
Running pipeline
In order to trigger a new build, we can do it manually by clicking on “Build with Parameters” and then on “Build” or we can just push a new change to our GitHub repo. This will take us to a view where we can see some details about each of the stages of the latest builds.
Installing Jenkins on your K8s cluster
If you already have access to a cluster but which doesn’t have Jenkins installed, you can do so easily using Helm. In particular, you will need to run the following:
[ ]:
%%bash
helm install \
    --name "jenkins" stable/jenkins \
    --namespace "jenkins" \
    --set "rbac.create=true" \
    --set "master.adminUser=admin" \
    --set "master.adminPassword=admin" \
    --set "master.serviceType=LoadBalancer"
This will install Jenkins and all the required services in the cluster. To get the Load Balancer where it can be accessed you can run:
[ ]:
%%bash
kubectl get svc -n jenkins | grep jenkins
Further configuration
If you wish to set up automated pipeline triggers, you will have to install the “GitHub” plugin (there are quite a few github related ones but the one you want is the one called plainly “GitHub”, which then will allow for triggering pipelines automatically on commit.
Install the GitHub Plugin (for automated webhook triggers).
Provide a GitHub token with read access so it can clone relevant repositories.
Set-up webhooks so that GitHub can send push requests.
Additionally, you will need to configure your Git’s name and email as part of Jenkins settings.

Make sure plugins are updated
If you try to run a pipeline and you get an error such as “No Such DSL Method”, or any strange Java exception when running a pipeline, the most probably reason is due to current plugins not being up to date.
Updating your plugins can be done by going to “Manage Jenkins” -> “Plugins”, and then selecct all the plugins and click “Update and load after restart”. This will take you to another screen - there you should tick the checkbox that reads “restart after plugins are downloaded and installed”.
Once you update our plugins you should be ready to go.
ArgoCD
A key point of this approach to MLOps relies on having a GitOps repository which gets synced with our Kubernetes cluster. To achieve this we leverage ArgoCD, which will take care of setting up webhooks with your GitOps repository so that on every change it triggers a synchronisation between the resources you’ve pushed and what’s deployed on the cluster.
Installation
If you don’t have it already, you can install ArgoCD following the official documentation:
[ ]:
%%bash
kubectl create namespace argocd
kubectl apply -n argocd -f https://raw.githubusercontent.com/argoproj/argo-cd/stable/manifests/install.yaml
Additionally, you will need to install the accompanying CLI tool. This tool will allow you to easily link your GitOps repository taking care of the entire process. The instructions to install it will vary between different platforms. The official documentation shows the recommended method on each of the major ones.
Setting up GitOps repository
To set up the GitOps repository so that it’s tracked by ArgoCD we will use the argocd CLI tool. We will assume that the GITHUB_ORG and REPONAME environment variables have been created and that the repository has already been created and can be found in the https://github.com/$GITHUB_ORG/$REPONAME url.
[ ]:
%%bash
export GITHUB_ORG=SeldonIO
export REPONAME=seldon-gitops
Private repositories (optional)
If your repository is private, we will first need to provide the right credentials for ArgoCD to use. We can do so either using a user / password login or using SSH keys. Note that, for the former, we can also use a personal access token instead of the password.
As an example, we will add our GitOps repository using a personal access token. We will assume that the environment variables GITHUB_USER and GITHUB_TOKEN are set.
[ ]:
%%bash
export GITHUB_USER=john.doe
export GITHUB_TOKEN=12341234

argocd repo add https://github.com/$GITHUB_ORG/$REPONAME --username $GITHUB_USER --password $GITHUB_TOKEN
Create ArgoCD projects
The next step is to create two projects within ArgoCD to manage the staging and production environments respectively. Each of them will be linked to a folder within our GitOps repository.
[ ]:
%%bash
argocd app create seldon-staging \
    --repo https://github.com/$GITHUB_ORG/$REPONAME \
    --path staging \
    --dest-namespace staging
argocd app create seldon-production \
    --repo https://github.com/$GITHUB_ORG/$REPONAME \
    --path production \
    --dest-namespace production
Note that we could also sync our staging and production environment differently. For example, we could have them on separate repositories or separate branches. In this case we would also need to update the promote_application.sh script so that it knows how it should promote the respective model between environments.